I’ve been using Sennheiser 8060 microphones for a number of years. Initially they were a revelation; it was possible to fit a directional microphone into a small windshield (Rycote WS1 MZL), massively reducing the size and weight of an exterior setup. However they had a drawback: most of the microphone’s length is now interference tube, there’s not much to suspend it by. It’s not easy to quickly change from a ‘full blimp’ to foam or lighter weight windshield as it needs suspension on the interference tube, so I left it in a ‘full blimp’ almost all the time. Some people keep the foam on the mic and make a hole in it for the suspension, although it won’t take repeated removal. If the foam’s left on in the ‘blimp’ it’ll reduce the air volume around the mic and the blimp’s effectiveness, whilst also dampening higher frequencies.
What’s changed?
At the time, the 8060 was the only solution, however there are now more very short shotgun mics, the DPA 4017C and Schoeps MiniCMIT. There are also some other windshield solutions- the Cinela COSI is a excellent compromise between an interior and exterior mount. Another change was the availability of low profile right angle XLR connectors; these could be used instead of the expensive MZL connector which needed to be screwed on to the microphone capsule. Rycote have also made the INV-Lite mount, which is designed for these microphones, but has the drawback of sitting too high in the blimp to be practical.
What have you done?
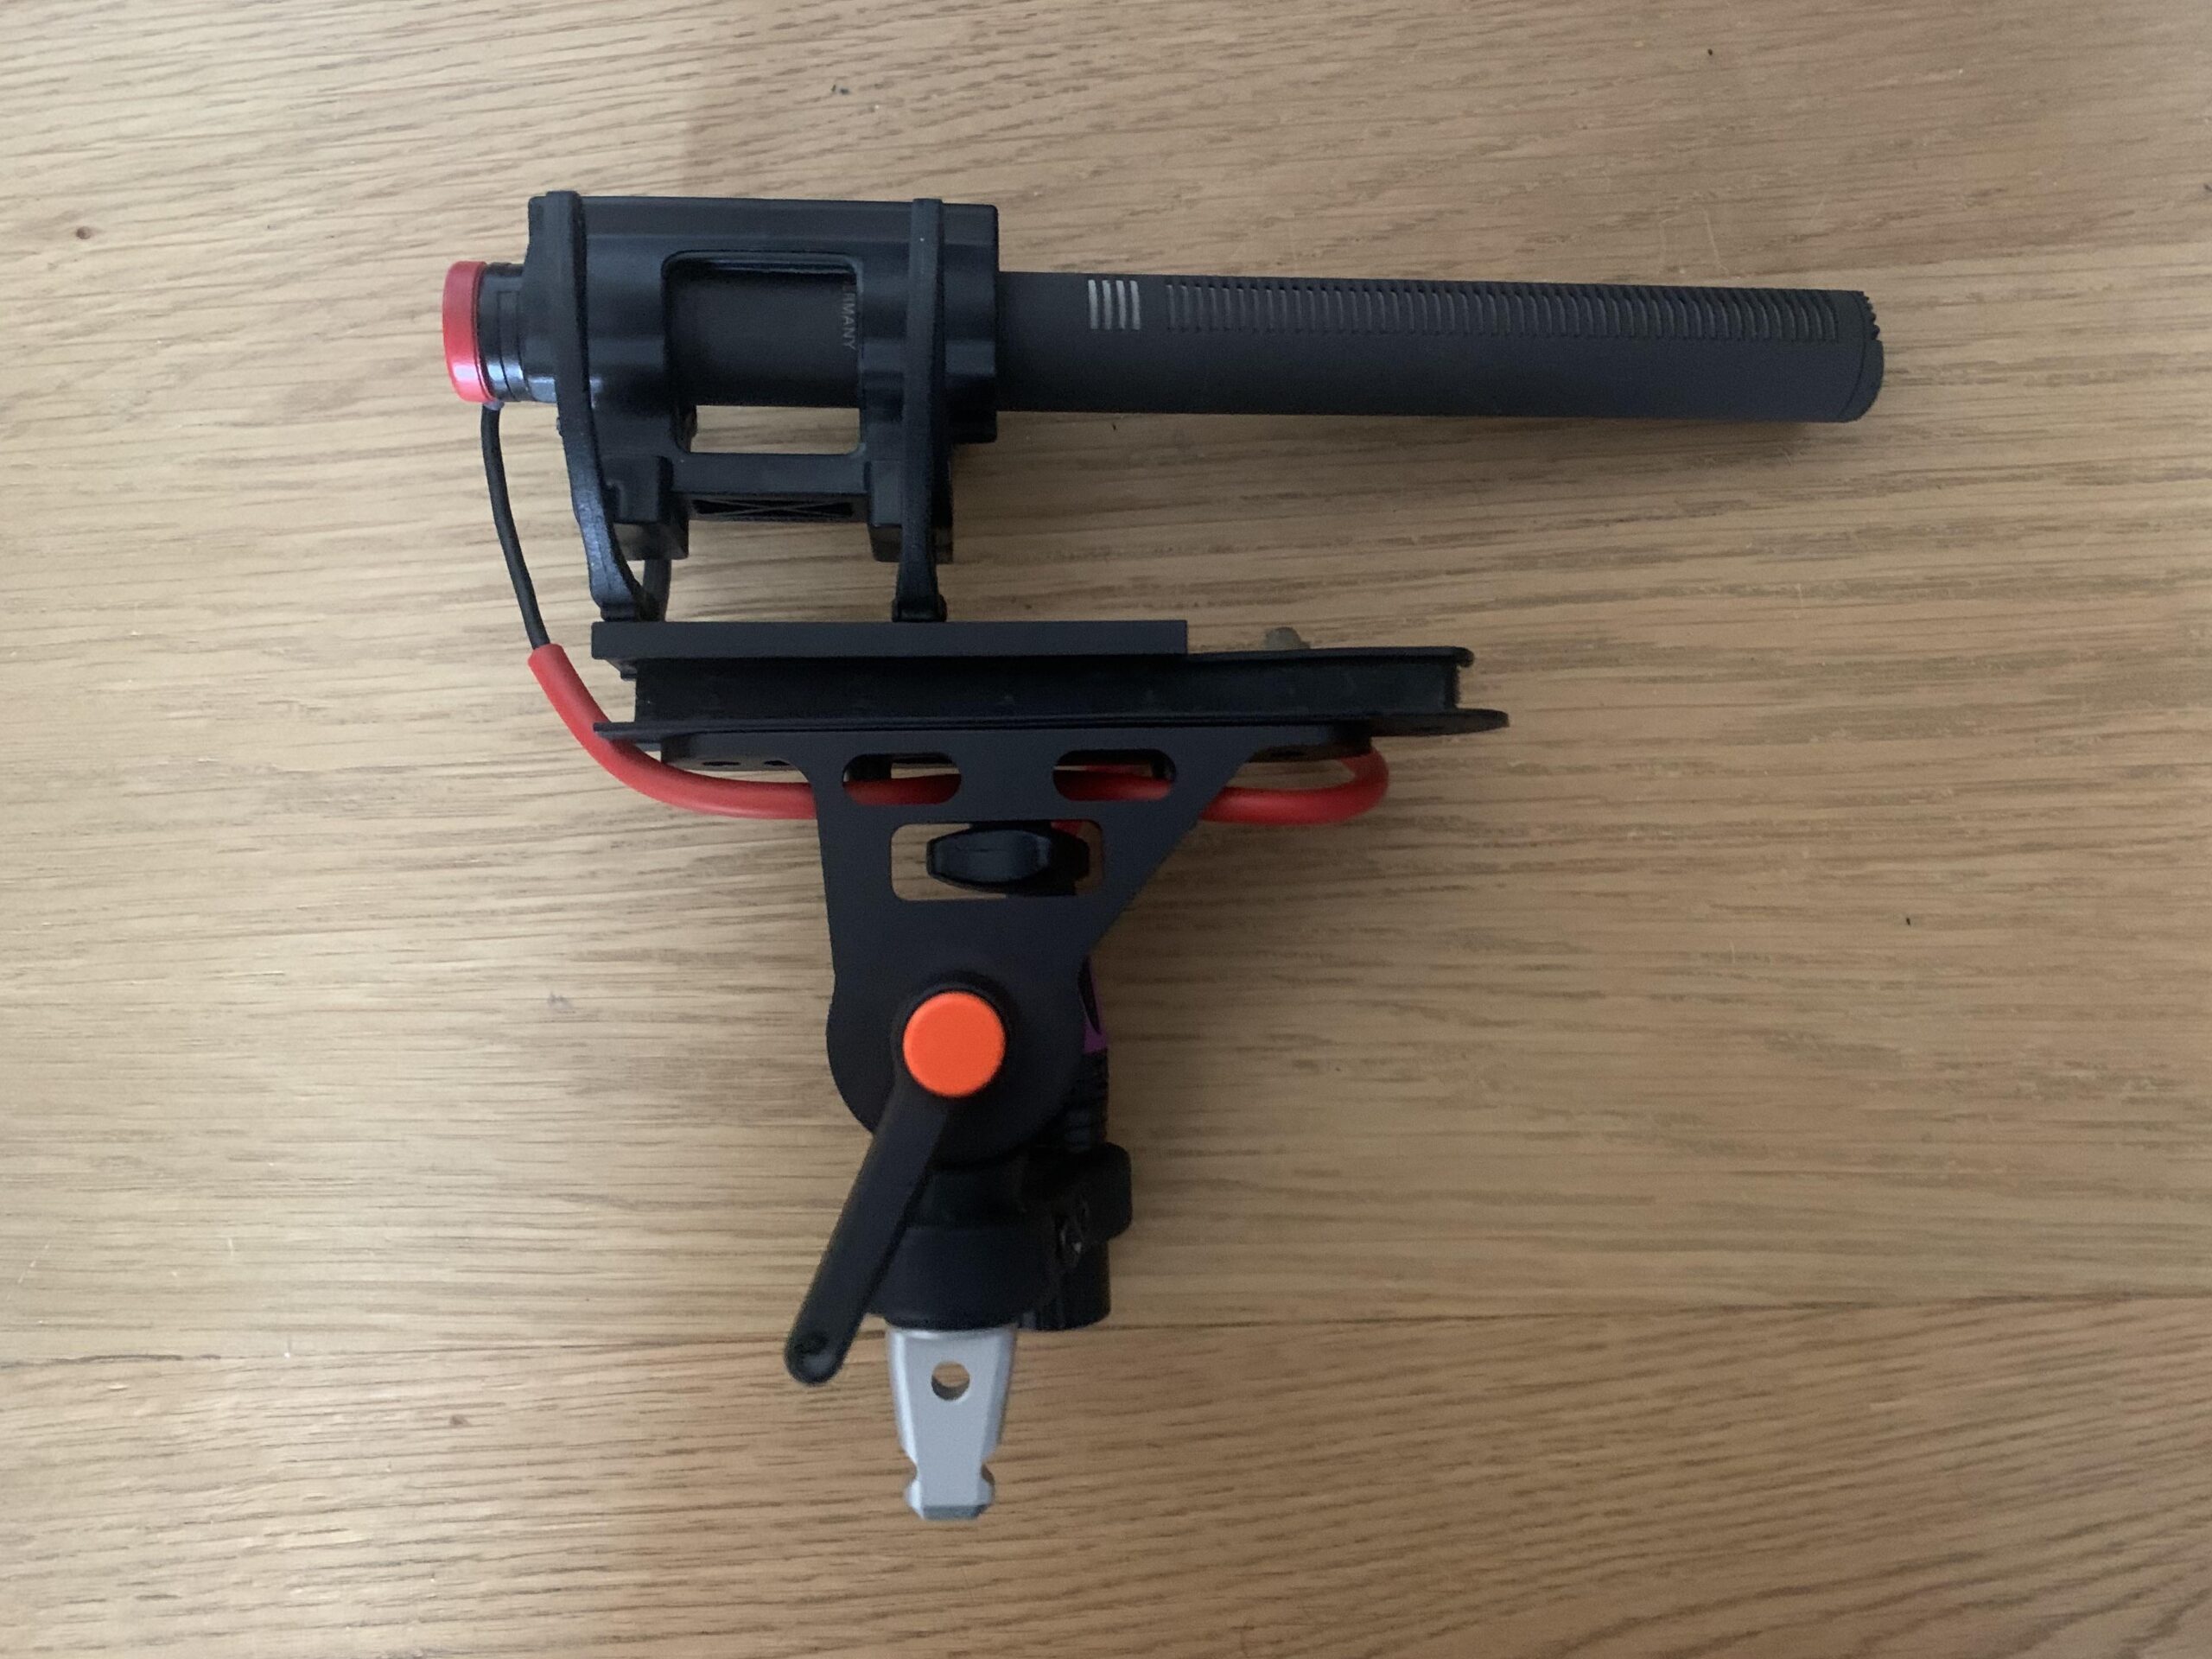
It’s actually not particularly complicated, although I’ve ended up using quite a few older Rycote parts I’ve shoehorned in. I’ve put an Duo-Lyre suspension at the back of the microphone and low profile XLR. Here’s an image which tells you what the bits of the suspension are called. The modular bar is an older one, on backwards. It only has one screw hole through the filler strip so I’m using an older metal modular bracket as has a position in the middle. It could possibly do with a second to stop it going wobbly when changing between interior and exterior. The other hole needed to be filled- I’ve used some Joe’s Sticky Stuff for that. This brings back the whole ‘hinge’ mechanism and helps with balance.
Microphone suspension without windshield
Low Cut Filtering
A lot of microphones do require some filtering to help get rid of handling noise and mechanical motion in the suspension and pole- the 8060 has some in it but more is often required. I did make a previous version of this with one of the special order 3rd order 70Hz MZF8000. Unfortunately I found out at the end of last year this had been discontinued and the stock version is only designed to counteract proximity effect. I’ve got some of Rycote’s discontinued Tac!t cables for this, which have an active 3rd order 60Hz filter in.
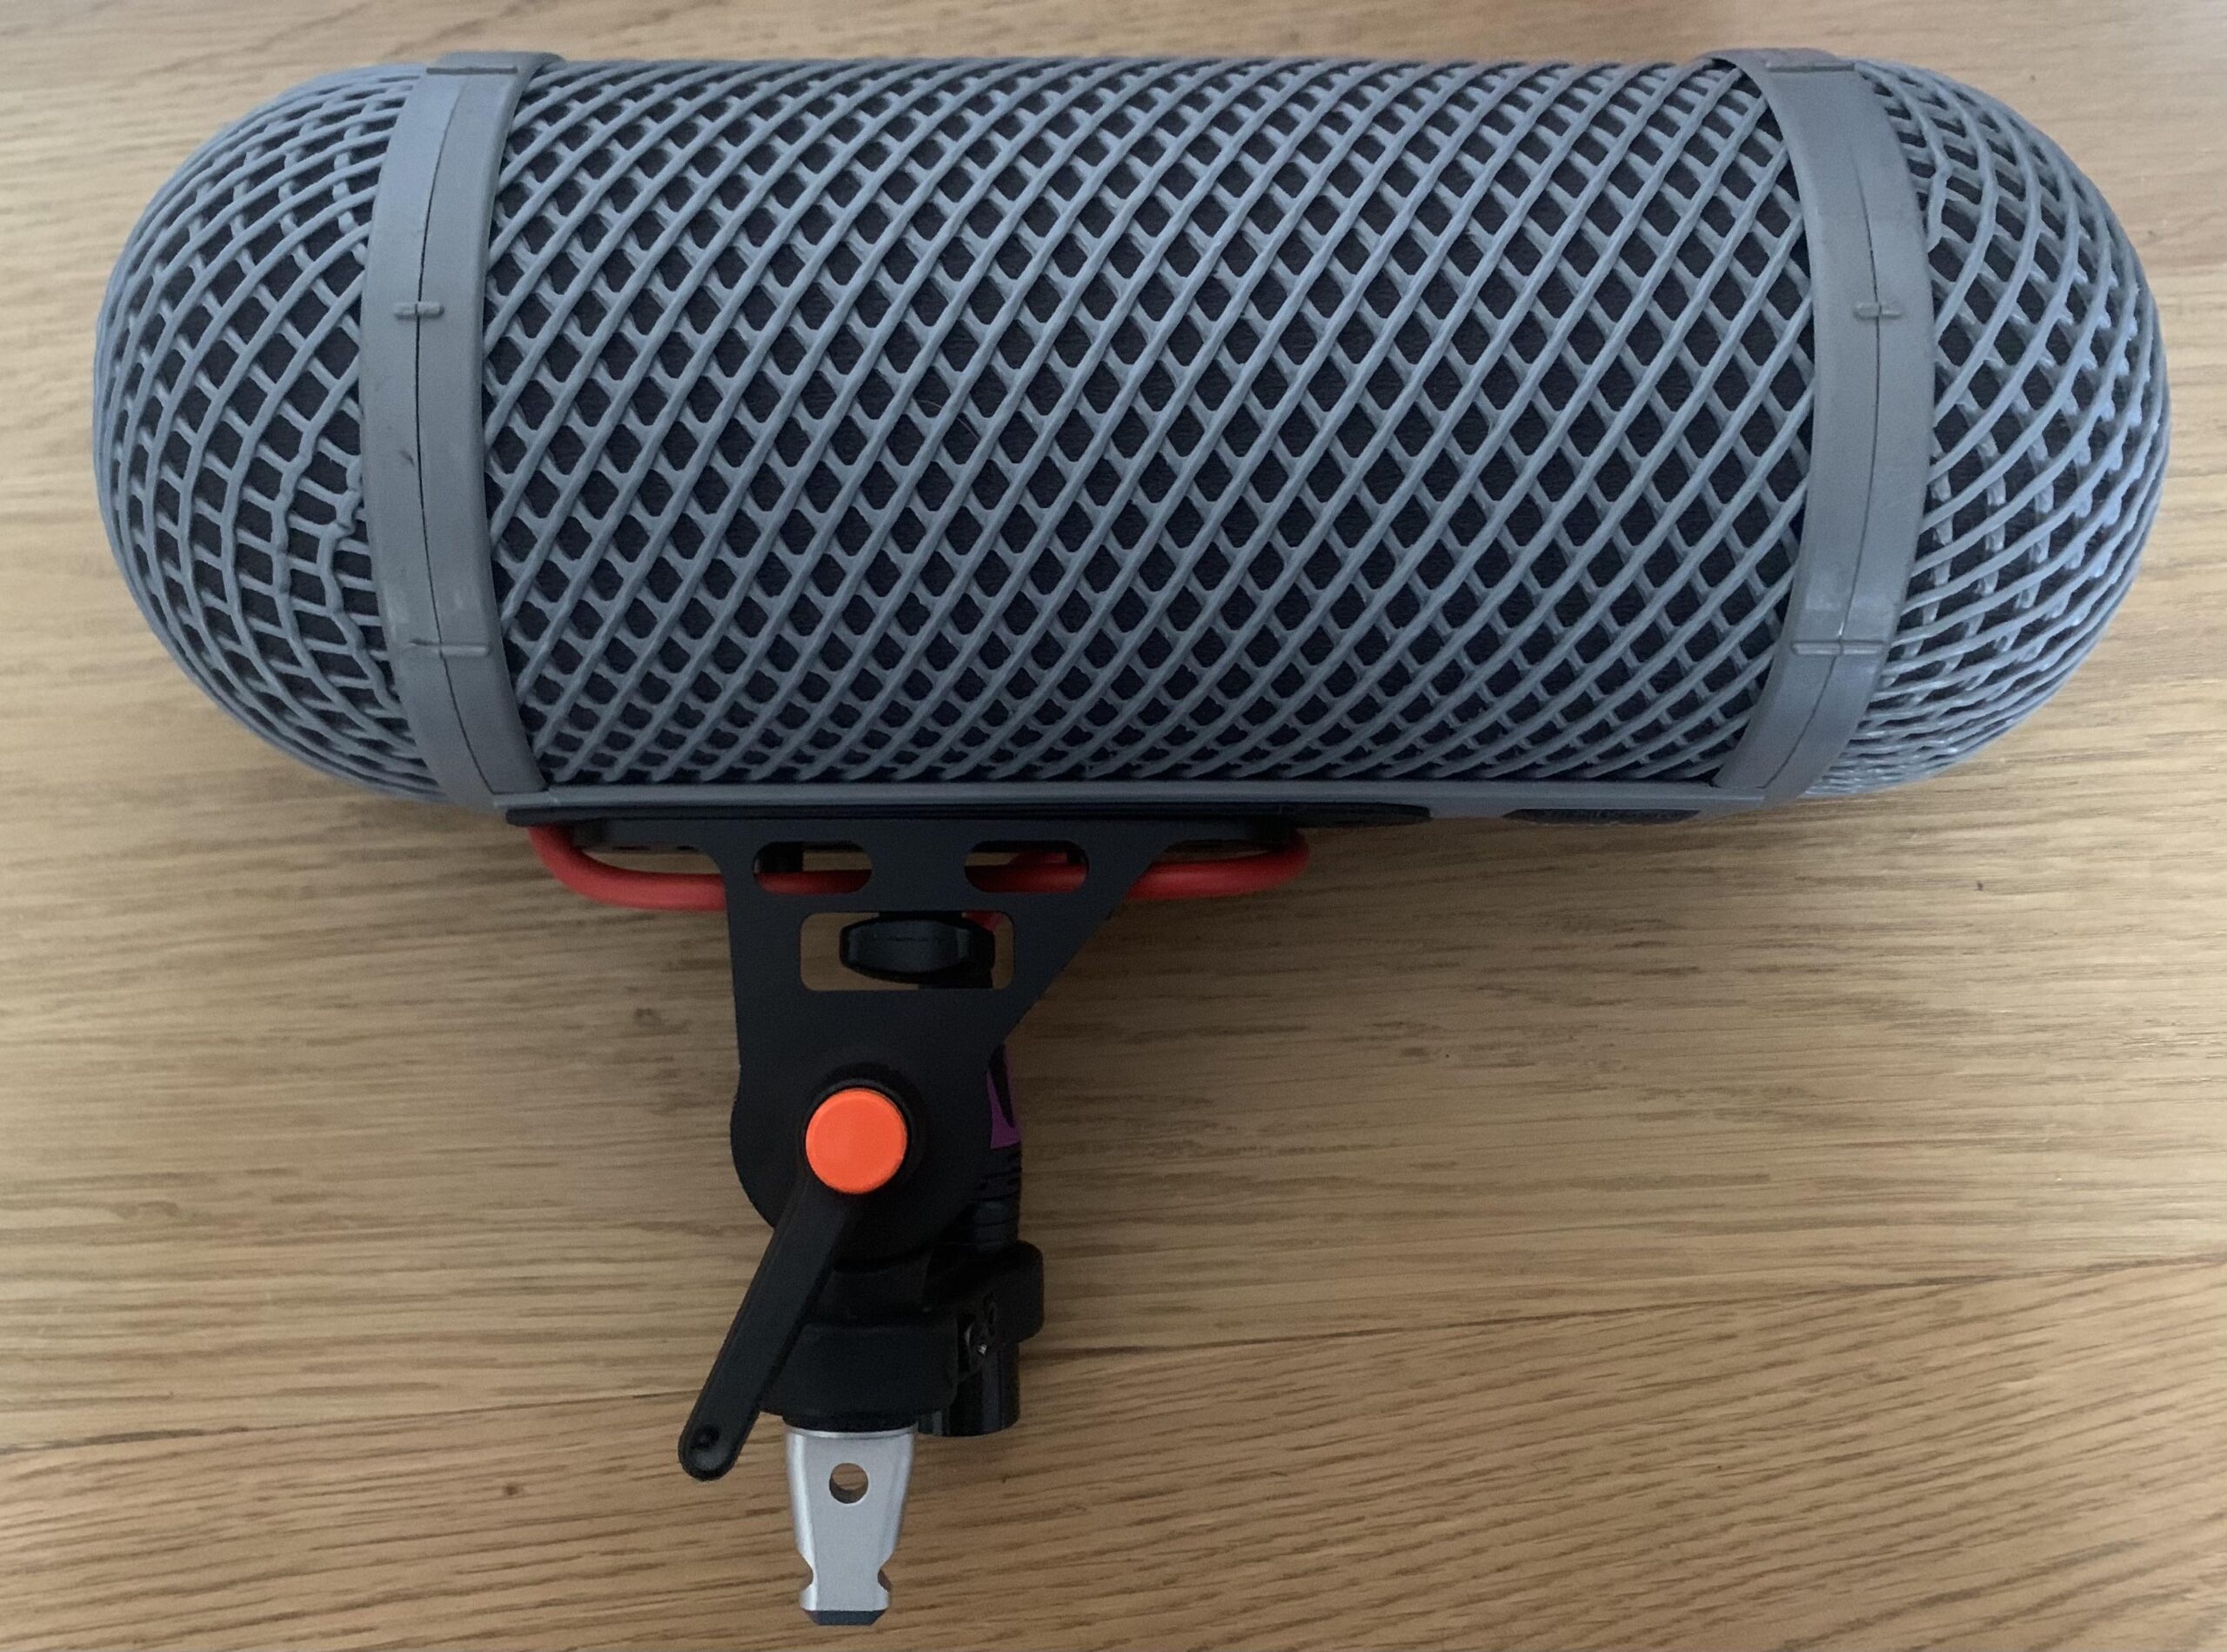
Windshielding
This now allows different levels of windshielding to be added to the mic. Here it is with a Rycote Softie-lite 19 as a heavier interior windshield
Just to begin, I’m sure most people looking at this post will be familiar with the 19″ rack standard, it’s a very common way of mounting professional audio and computer equipment. ‘Half rack’ is effectively mounting equipment which is half the width of that (or is it?).
Basically half rack isn’t a real standard, it’s what happens when you get equipment where 2 units are designed to fit in one 19″ unit side by side, however it just so happens that you put rack ears on one of them, they seem to be the right size and a few manufacturers have made racks for this equipment.
19 divided by 2 is…
So, how wide is this equipment then? The original 19″ rack width includes the rack ears. Here, the rack ears are the same width, so it’s going to end up being slightly wider than 9.5″- in fact 10.5″ seems to be a standard.
What fits?
As it’s not a proper standard, I thought I’d start compiling a list on here. Please feel free to add stuff if you find it. Also as it’s not a proper standard, they may be some specific combinations which don’t work (especially if there are holes for screws rather than cage nuts)
* items I’ve not personally tried, however the measurements look correct
We’re starting to see more useful products using audio over IP, all of which need switches to connect multiple devices together. This is effectively a patchbay for these devices, however the routing is determined in the devices themselves, while the switch is effectively the patch cables sending the data to and from the right destinations. Here’s an overview of what a switch does and how it works: https://www.oreilly.com/library/view/ethernet-switches/9781449367299/ch01.html
Specifications
I’m mainly going to be using this one using Audiante Dante, which is a proprietary audio over IP system. This will work using most off the shelf switches, however they do recommend using a managed switch, especially if there’s going to be other data on the network. It need to be able to carry gigabit ethernet, supply power over ethernet, have over 5 locking ports and run off 12V DC power. And not make any noise.
Unfortunately I couldn’t find any switches on the market that fulfilled all those specs, so I’ll have to adapt one
Starting points
To begin with, I need a switch. One that ticked most of the boxes was the Cisco SG250-08HP. The Cisco SG250 series seem to be one of the more frequently recommended switches used for Dante networks. This is the smallest one in the series which can supply PoE. However, it comes with a (rather hefty) 52V PSU. It also doesn’t come with ethercon connectors, they seem to only be on some more specialised switches for the AV industry (all of which seem to have mains supplies)
Power
In order to get the switch to run off 12V, it needs the voltage to be increased with a DC-DC Converter to something approaching the 54V specified on the input of the switch. I say approaching, because I had a 48V DC-DC converter which I’d previously been using to power another PoE switch. It also already had the Kycon KPPX-4P connector on and had the same wiring (which is fortunate as that took some finding…).
I’m not sure exactly what the power draw of the switch is, however it can supply up to 45W of PoE. The mains power supply which comes with the switch is just short of 60W (54V at 1.1A).
The DC-DC converter I’ve used is only 40W at 48V- the switch seems to run fine on it though, however there isn’t enough power to run the full capacity of PoE devices. There is a bigger 60W model, however it is bigger and may be difficult fitting it into the case.
Casing
My intended use for this is to mount it on a Soundcart MiniCart. This has 10.5″ ‘half rack’ mounting points, which seems to be a ‘half-standard’, as there’s another 9.5″ half rack spacing. This seems to work with most boxes which are designed to be mounted side by side in a rack by putting both rack rears on the same box, although they’re not really designed for this.
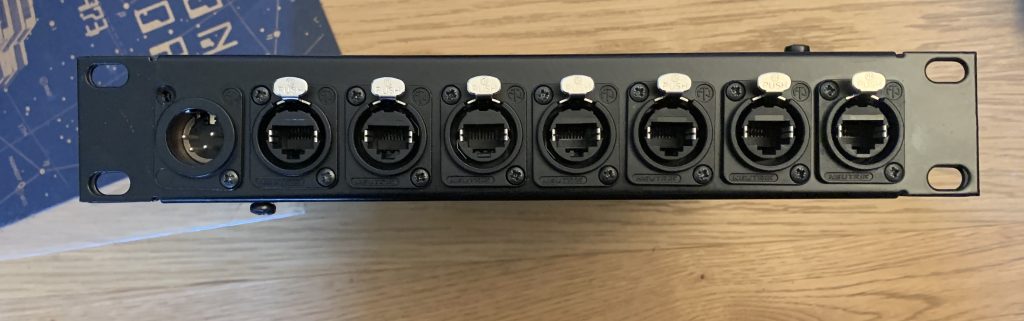
I’ve used some off the shelf parts from a metal fabrication company, however there were a few issues getting things to fit- all 8 ethercon ports won’t fit on the panel and still get in the enclosure- and the 4 pin power connector just fits, with some filing down of the sides! The case itself is steel, so has a fair bit of weight to it.
Connectors and Cables
I opted for the ‘feedthrough’ ethercon connector as otherwise there was a lot of soldering involved. I also realised that regular moulded RJ45 cables wouldn’t fit in the chassis, so had to swap them out for low profile flat ones. This put the build of this back a week. These are probably less hardwearing, however won’t be moving about in the chassis.
I did consider some of the more weatherproof connectors, and even bought some flip down panels– however they were fouling each other when packed together that densely. Given there are holes in the chassis for airflow (which the switch and PSU will need), it seemed a bit much fully weatherproofing the connectors, which would have added further cost
Layout
It ended up all being a bit tighter than expected- I originally imagined the switch ports behind the ethercon connectors. This way, however does allow you to look through the side vents to see LEDs
It all fits together like this
I want one!
I’ve had a few expressions of interest in people buying these- there might need to be a bit of refinement of the metalwork, including a little more space and an extra output for the 8th port. This is currently a prototype but let me know if you’re interested in one- it’ll need a few refinements, but I could potentially get a run of these put together. Back of an envelope costs are around £300+vat for the whole thing
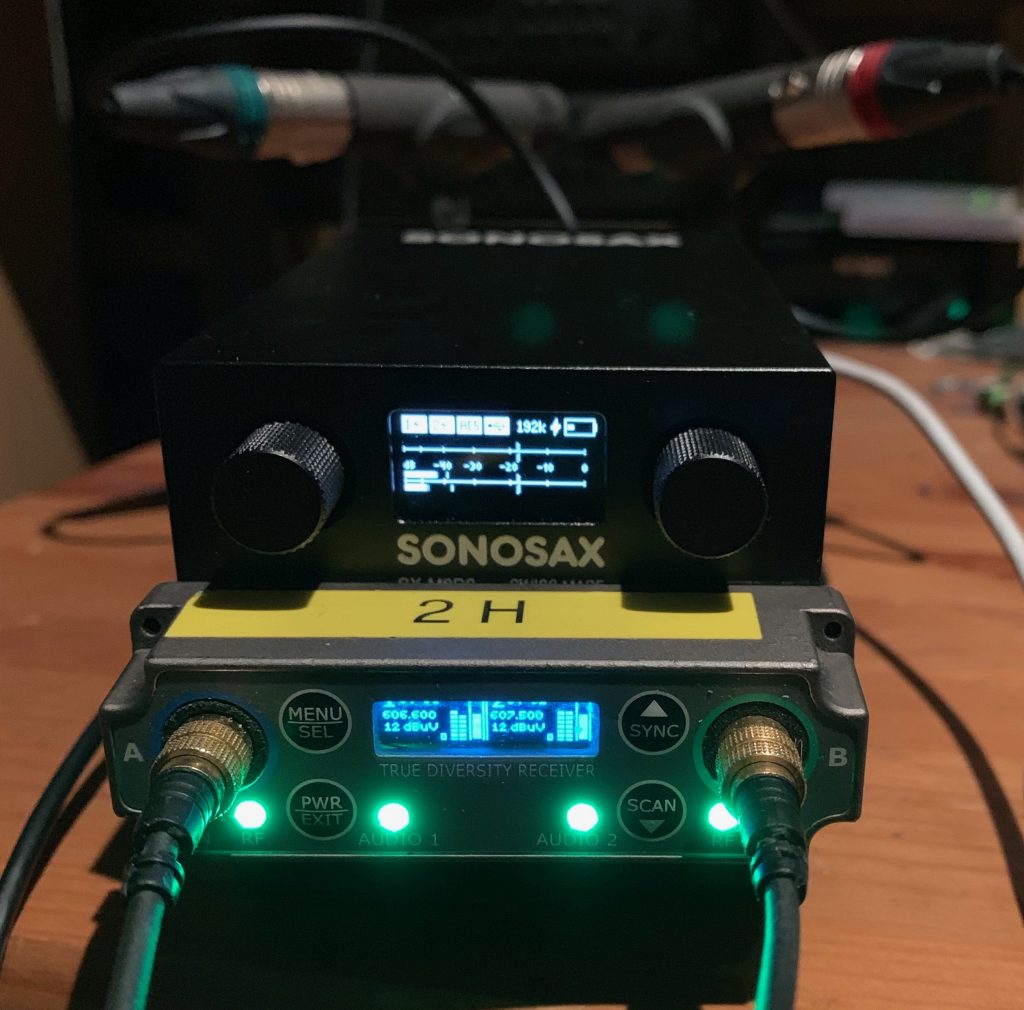
Sonosax have offered me a pre-release SX-M2D2 for beta testing, I’ve had a few days to poke around it and try to find where it falls over, so this doesn’t happen in the production version.
SX-M2D2 connected to 2x Sennheiser MKH8040 and Wisycom MCR42 receiver
What is it?
On the Sonosax website, it’s placed under ‘preamplifiers’. It is a 2 channel preamp, using the current R4+ / AD8+ style preamps with dual ADC, which give you a lot of clean gain. Personally, I really like Sonosax preamp design- they’re very clean and seem to add less noise than almost any other design I’ve heard. For the analogue purists, the dual ADC is an integral part of the preamplifier design, so it has to go into the digital domain. The SX-M32 or SX-M2 may be a good alternatives if you want to stay analogue and just want a preamp.
However, there are also other connections: an AES input and output, supporting both AES3 and AES42 and USB-C in and out (as a 2×2 interface) and it’ll run up to 192kHz, for fx recordists, audiophiles and bats.
There is also a 2 channel unbalanced output (on TA3) and a headphone amp, which sounds very clean and is happy driving 250ohm headphones
It’s a very small device, but feels quite weighty and sturdily built. I did have thoughts of putting it on a boompole, but it’s a bit too substantial for that.
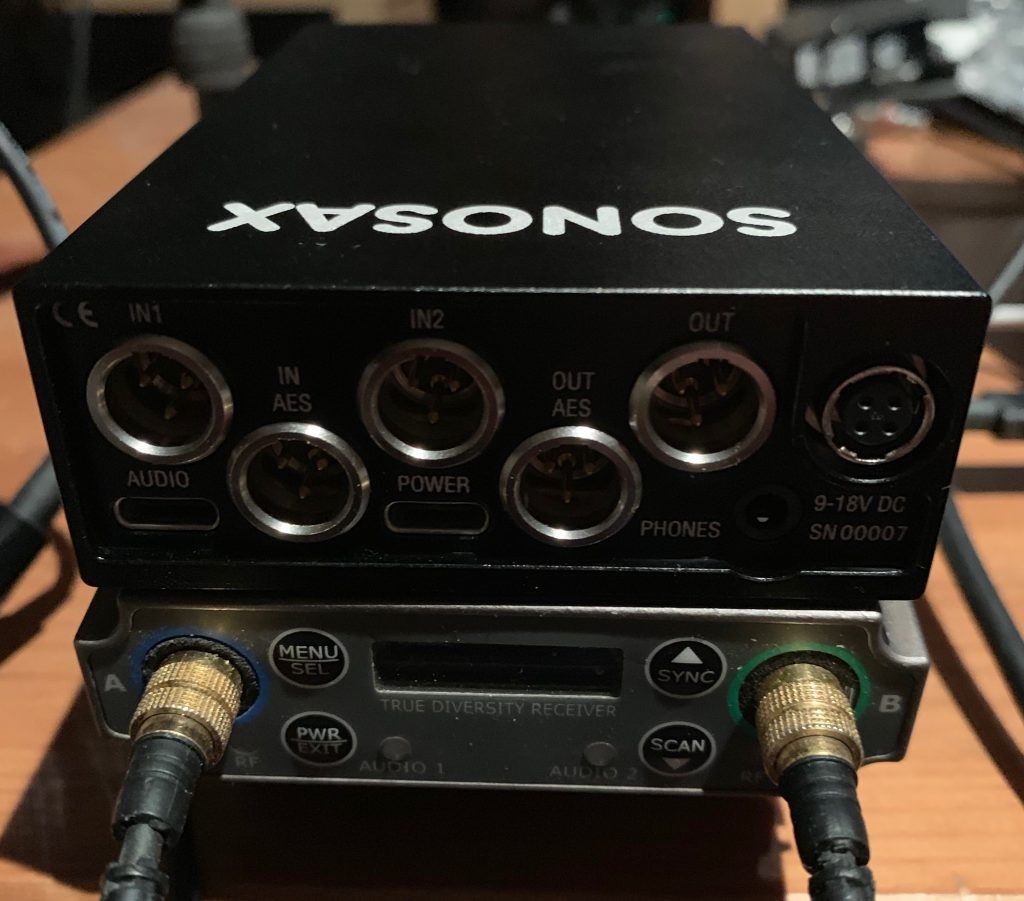
Connectors at rear
Digital bits
This is where it gets interesting and makes it far more than just a preamp. Software-wise there’s actually quite a lot going on, there’s a full routing matrix and mixer. Knobs are assignable to a number of functions with turns, short presses and long presses. Similar thinking to how routing works in the R4+ is applied here, with inputs and outputs routed in pairs and with 4 assignable presets. Different routings are possible on all inputs and outputs, either going via the mixer or direct from inputs.
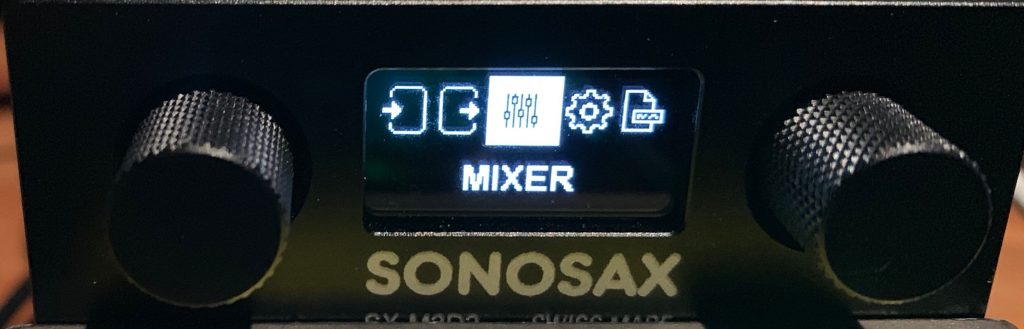
Despite the complex routing possibilities, the menus are clear and reasonably ‘flat’, only running 3 layers deep for some of the more advanced settings. They’re generally navigated with the knobs with ‘forward’ and ‘back’ with short presses and the entire screen and knobs can be flipped.
Menu
What’s it useful for?
Initially it seemed like an add on for the R4+ ecosystem, simultaneously adding 2 more preamps and analogue outs in a small box, running in and out.
It seems like a very good way for production sound mixers using other manufacturers’ equipment to get access to Sonosax sound for cabled booms, where 2 preamps is usually enough. It also allows them to get AES42 as an input- it’s also capable of adding lots of digital gain to these signals, which users of some other equipment have found lacking.
It’s a 2×2 audio interface with AES3 in and out, so allows direct digital interfacing with a computer (or even a smartphone!) for playback, processing or recording direct to the device. It can even be a very expensive headphone jack adapter, for those who demand high quality music playback on the move.
There are a few small hardware recorders which can interface over AES3 and record timecode stamped files, making a very compact additional recorder.
Phone recording
Having a bit of a look at various bits of phone recording software, I’ve found that Apogee Metarecorder for iOS is possibly the most suitable for production sound. It’ll talk to Timecode Systems’ Ultrasync Blue over bluetooth and receive accurate timecode. Cable wise, I’ve found the neater apple lightning to USB-C cable doesn’t work, but the ‘camera connection kit’ does, I think it requires a USB host port.
Powering
We have another battery system here. It’s got a single 18650 Li-Ion cell- you may not have heard of these, but they’re some of the most common batteries in the world. They’re used in NP1 and other Li-Ion battery packs, such as the 2054 format smart batteries. They’re also in a lot of e-cigarettes, so you can buy them from ‘vape shops’, which seem to be everywhere now. It’ll charge the battery over both a USB-C input or 9-18VDC in on the hirose input, so can work with both consumer phone batteries or professional sound bag distribution systems.
Field mixer?
Given the input and routing possibilities, along with being able to pair it with a recording device- I’m wondering if it could effectively be used like a 4 channel field mixer with recorder, running a pair of radio mics into the AES3 in, mixed to the right channel on the knobs and a boom on the left out. At the moment the software doesn’t quite allow this, but possibly could with a few tweaks. It would be possible to balance the unbalanced outs, and run a mono camera return to the second analogue in and route that to headphones.
To put together a comparative real world test for different digital and analogue radio mic systems, whilst keeping as many variables as possible constant. With thanks to Audio Dept for providing equipment and a place to test it.
Method
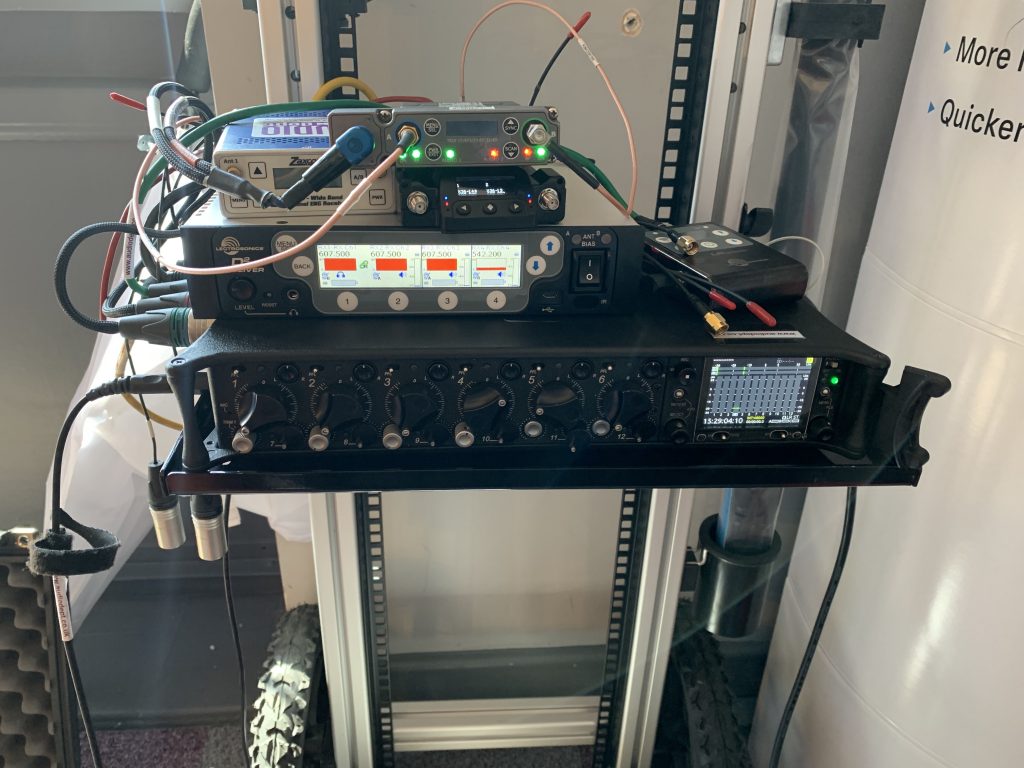
A recorder (Sound Devices 688) was placed in a static position and connected to various radio microphone receivers using balanced analogue connections. Antennas were attached to a Lectrosonics D2 receiver and RF loop out cables with 50ohm BNC to SMA connectors to any other receivers in turn.
Recorder, receiver and antenna setup
All receivers and transmitters were tuned to 607.500MHz (this was a clean frequency on the D2 scan, and covered under the shared license) and only turned on for the duration of their walk test. The Lectrosonics D2 remained powered up throughout for antenna distribution as the antennas remained attached.
For each test the transmitter was put in my left pocket and a bare sanken cos11 microphone was attached to the transmitter and a comparable gain level was set (different on all transmitters). The microphone was held in front of me at chest level (not clipped on). All transmitters were set to 50mW.
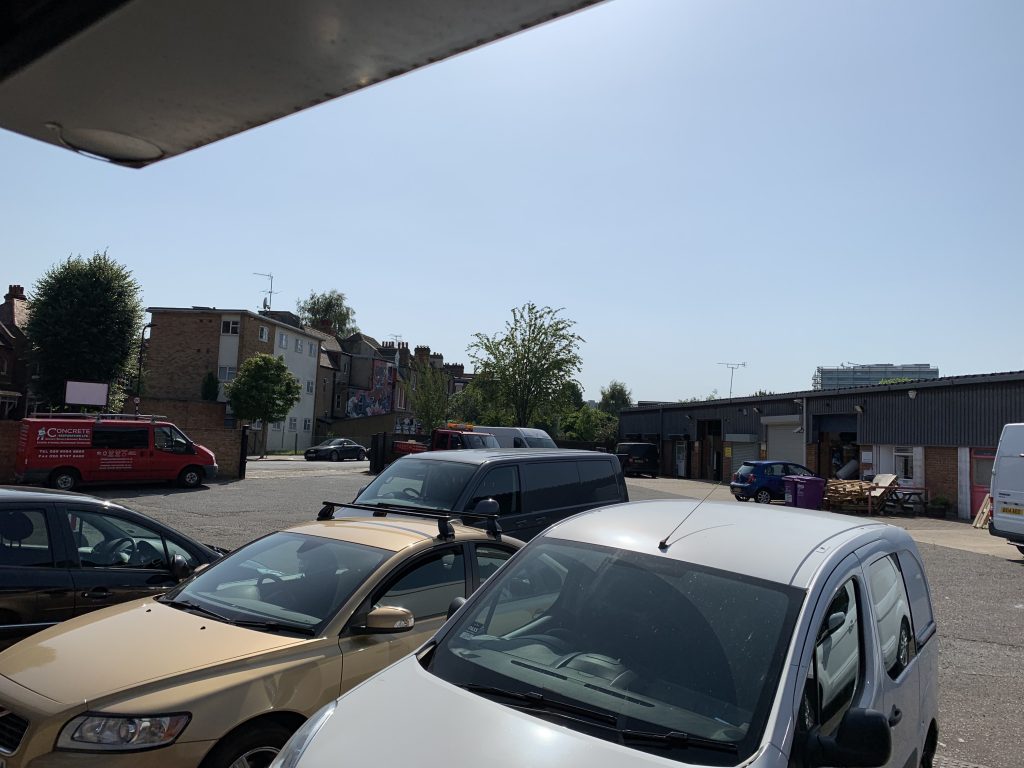
I walked out of the door (the recorder was next to it), past some vans in the car park to the gate, turning right by a brick wall and getting to a junction and then walked back along the same route.
Walk test Door to gate
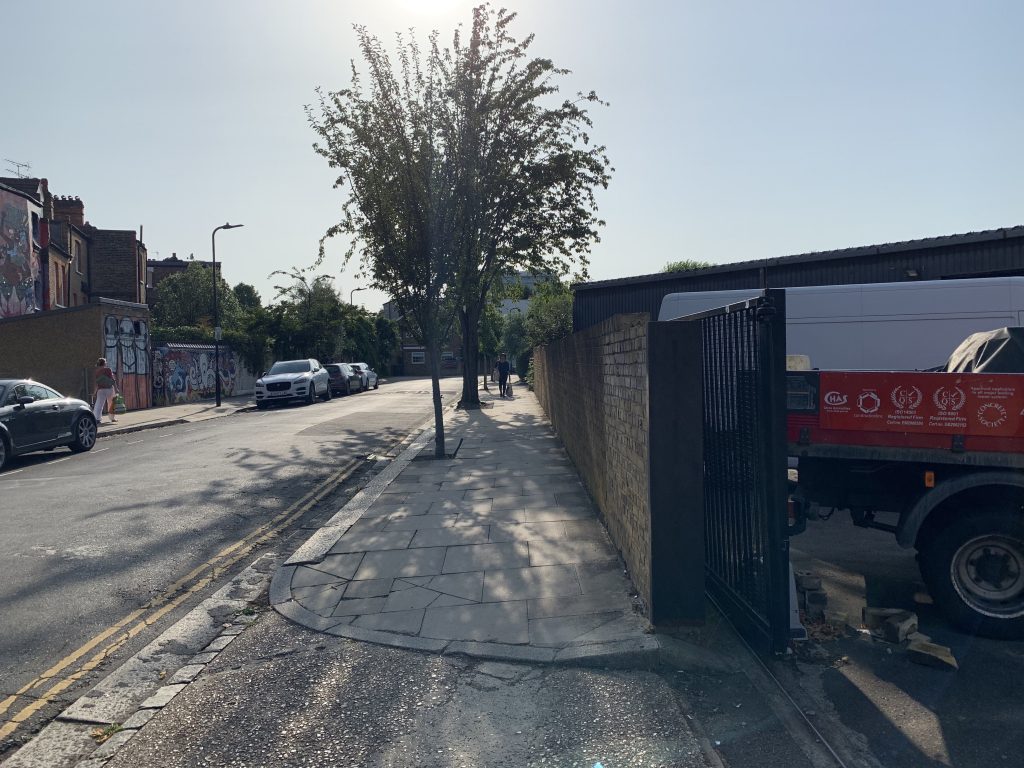
Walk test gate to corner. The house on the left is really quite something.
While running the test I would count out paces, 40 to the gate and 100 to the corner and count on the return journey.
The Wisycom MCR42 was set to 0dBV squelch, none of the other systems had an option to adjust this.
If there were any instances of multiple receivers being able to receive the same signal, then I would use them simultaneously (in the case of Lectrosonics D2 and Lectrosonics LR receivers with an LT transmitter).
I did originally intend on using a Lectrosonics SMDB transmitter and UCR411a receiver alongside the D2 in digital hybrid mode, but unfortunately couldn’t get it to receive either SMDB or SMB transmitters in block 606.
Results
It’s a bit difficult to put these together objectively from listening to the files – especially comparing both digital and analogue systems with different settings. Different systems break up in different ways. I’m going to attempt to describe what happened on each test.
Lectrosonics LT with D2 receiver
Some pops at 26 paces, shash at 43 (behind the wall). ‘Shash’ and major dropouts to 70m when the signal dropped. Returned at 68 paces on the way back relatively clear until it got worse at 55 paces. Reasonably good again from 43paces back, but a couple of instances of ‘raised noise floor’ and low level pops.
Lectrosonics LT with LR receiver
This test is done on the same run as the LT with the D2 receiver. Single pop at 35paces, clean til 43 when shash comes in. Clicky and shashy all the way to 100paces (end of test) and loses signal when turning around, however intelligibility remains. Signal comes back at 84, but is fairly unusable until 65-55 where it’s good with a few pops- then interference comes back until 44 where it’s clean until the end
Lectrosonics DBu with D2 Receiver
This is Lectrosonics’ new digital system, dropouts on this seem to have a ‘thump’ quality to them, in that they have a low frequency element to them when they drop off, rather than the ‘blip’ from Zaxcom and Sony digital systems and may be easier to work with in post. In fact, a single dropout seemed to keep dialogue intact over the top. In the test we got our first dropouts at 36 and 38 paces. Signal was relatively clean until 43 paces (round the wall) and then became unintelligible from dropouts apart from the odd number. Signal comes back at 70 paces on the way back and remains relatively intelligible with some dropouts until the gate at 40 when it’s clean again til returning
Zaxcom Mono-XR
Zaxcom have a number of different digital modulations which will work on their transmitters and receivers. The first I’m testing is ‘Mono-XR’, their ‘long range’ modulation. Got to 45 paces before a blip, then unintelligible until 55-60 which is intelligible, then it’s basically gone. On the way back 74-68 is intelligible, then unintelligible until 41 and it’s then clean all the way back
Zaxcom ZHD96
This is one of Zaxcom’s modulations designed for lower bandwidth and squeezing more channels into a smaller space. They also recommend this for using in more reflective environments. First dropout was at 46 and 50-55 is lost, but remained surprisingly intelligible all the way up to 80. On the way back, the signal’s properly picked up at 78 and remains intelligible until 46 where it’s clean all the way to the end
Audio Ltd A10
I’m not completely sure we had a fair test with this one, although we had vehicles coming in and out of the car park throughout the day- there was a van pulled up in the gate entrance by the time I did this test, and I’m sure it was putting out a fair bit of RF. On this run it was clean until 25 paces when some lower level dropouts started. Made it to the gate at 40, but unintelligible by 41. Coming back 69-60 was intelligible, bigger dropouts from 59-41, then clean from 40 til the end.
Sennheiser SK5212 and Wisycom MCR42
Here the Wisycom MCR42 was put in SEN emulation mode to receive the Sennheiser SK5212 transmitter. Heading out had a single splat at 31 paces, then clean all the way to 49 paces. At 53 paces there’s quite a lot of shash on the signal, peaking at 100 and subsiding to some minor pops and shash around 85 on the way back, gradually getting less frequent until it stops at 50 on the way back to be clean the rest of the way.
Wisycom ENR
Wisycom use two of their own compander modes- ENR describes as ‘noise optimised’ and ENC described as ‘voice optimised’. This is with an MTP40S transmitter and MCR42 receiver. Single splat at 30 paces and a couple of very minor ones before 40. More pronounced interference at 49 paces, but intermittent and a good amount of useable audio all the way up to 80 paces. Again, mostly good audio with some interference from 89 paces onwards on the way back, but only being totally clean at 40 paces til the end
Wisycom ENC
This is the other Wisycom compander, which seems to work better in situations with more high frequency transients. Here we had a couple of big splats at 29 but generally minor until 49 paces. Was then bad shash until 82 on the way back and then clean again at 40 paces
Graph
I made a graph! It took far too long
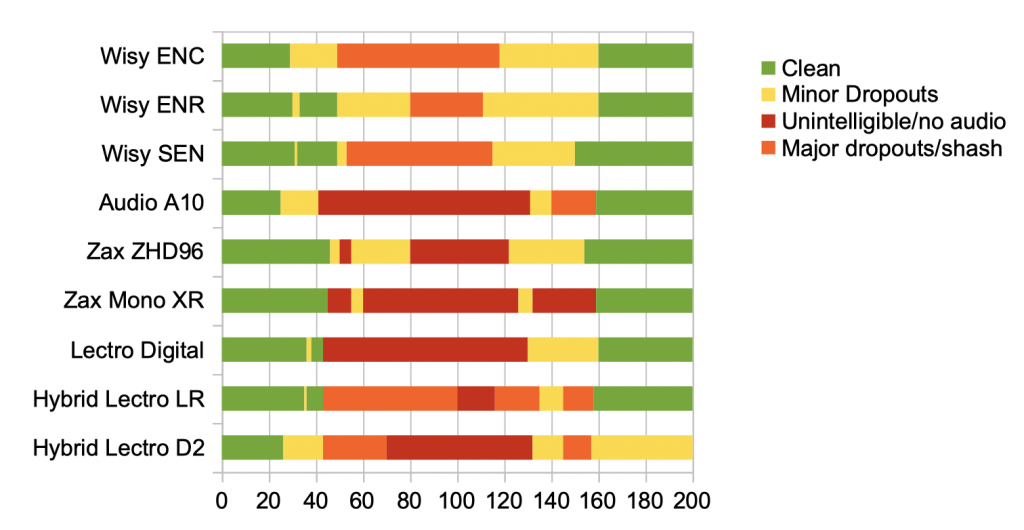
Graph showing RF performance against distance travelled along the route
I’ve roughly divided the audio into what I consider clean (green), Minor dropouts (over 95% good audio), Major dropouts/shash (intelligible but not useable audio) and red for either totally unintelligible or no audio. Distance along the bottom is how far along the route, in paces (sorry, not an SI unit) with 100 paces being the furthest point.
Conclusions
I think there are a number of ways you can look at these results. Basically orange is only useful for comms. Yellow could be described as ‘borderline’ range- you don’t want to be there, but you may get what you need. Green is the only truly “in range” area.
It’s also worth noticing that the digital systems don’t really have any orange, and the analogue systems don’t really have red. The analogue systems keep transmitting (noisy and/or distorted) audio, while the digital systems just fall over. All three digital systems seem to fall over in a different way, though- Audio Ltd seem to have a short fade out, Lectrosonics add some low frequency, while Zaxcoms make a ‘blip’ noise. The Lectrosonics method seems to psychoacoustically cover the gap a bit – it’s harder to distinguish it between something like cable movement and a dropout, though.
Range-wise it seems like as far as picking up useable audio is concerned that the Wisycom ENR came up top, however the Wisycom in SEN combined with the Sennheiser transmitter had the highest ‘green’ percentage. The Lectrosonics LR/LT also had a healthy ‘green’ percentage, and although there’s a fair bit of orange on there, it’s mainly from consistently raised noise floor and audio was lost because squelch can’t be disabled. Would be interested in how a SMDB/411 combo works in comparison to this.
On the digital side of things, the biggest surprise for me was the ZHD96 performance. longest run from the start before a dropout and seemed to keep fairly consistent audio up to 80 paces. I actually expected the other zaxcom modulation to do better.
Solid performance from the Lectrosonics digital, especially on the way back. It seems the the way it deals with the odd dropout is good, but once you get quite a few it’s mush.
It’s also interesting how the D2 dealt with hybrid and digital signals differently, it didn’t do as well as the LR, but it seemed to work in some places where the digital receiver didn’t.
I’m also not sure the A10 got a fair run out here, I think this test may not have worked to its strengths and I’ve heard there are significant performance increases with a recent firmware update, which wasn’t installed.
Further tests
Don’t take this as the be-all and end-all. It’s just one test and probably do with being repeated and may have different results even in the same place on a different day. It wasn’t in a stable RF environment and with the amount of obstacles and metal around was very challenging. It also only tested one transmitter, things could get very different with a bunch of them out, for both analogue and digital systems.
This also doesn’t take into account sound or features, which may both be more important to some users.
If anyone really wants to listen to me counting in a car park, I can send over the recordings (and hide track IDs for blind comparison)
I’m now having another look at radio microphones, and a few things have changed since the 2011 comparison. There haven’t been a lot of changes to the base technology, although a number of companies have ‘gone digital’ and there have been a number of refinements made. I’m going to comment a bit more about newer features and how useful they are in the ‘real world’.
Analogue and Digital
Audio Limited have gone full digital now with their A10 system and Sennheiser have their 6000 and 9000 series. Lectrosonics have re-launched a new digital system, the D squared (which I’m yet to test). The Sennheiser EK6042 receiver is backwards compatible with Sennheiser analogue systems, however they perform similarly to the digital transmitters. The Lectrosonics D2 can also do this (with Lectrosonics digital hybrid transmitters) and I’ve not been able to compare performance with an analogue receiver.
Digital does have some advantages and disadvantages compared to analogue systems, for more details see Analogue vs Digital Wireless.
Some of the more established digital manufacturers (Sony and Zaxcom) now offer choices of modulation, some of which can offer better range or ability to squeeze more transmitters into an even tighter frequency range, however this is at the cost of higher latency.
Recording Transmitters
There are some jobs where this is the only option and back in 2011, the only option for this was Zaxcom. Zaxcom also have a US patent on this which has stifled competition in the US. Audio Limited now have recorders on the A10 system (enabled outside the US only) and some of the newer Lectrosonics transmitters can be enabled to either record or transmit.
There is also an advantage to the Zaxcom system, in that they simultaneously be timecode jammed and record enabled over Zaxcom’s 2.4GHz ‘Zaxnet’ control frequency. This can save a lot of time over individually jamming a number of transmitters manually, as is currently the case with other manufacturers’ systems.
Small Transmitters
For some time, the limitation in how small transmitters could be made was down to the size of the batteries that could be put in them. We’ve now got access to smaller Li-Ion batteries with higher energy density and a number of manufacturers have incorporated these into wireless (especially given the higher power draw on digital systems). There is a trade-off, however: smaller batteries=shorter run time. Some of the smaller transmitters are also more limited with their output power- I expect as a decision to retain battery life.
The Lectrosoncics SSM and Zaxcom ZMT3 both use the ‘Fujifilm NP50’ standard battery, while Sony DWT-B03 uses their own NP-BX1 camera battery. Both of these are available from consumer camera shops, however there are a lot of ‘fakes’ around which usually don’t perform as well.
Sennheiser use their own proprietary batteries, which are less readily available, however they have the advantage of providing accurate runtime telemetry.
Another company that’s worth mentioning is Q5x, and although they do make their own receivers, really specialise in transmitters. They tend to be very small and flexible so can be fallen on without injury, for example in sports or during stunts. They use analogue transmission and can be received by wisycom and lectrosonics. However a drawback is that the batteries are built in to the transmitters, so they can’t be swapped out in a shooting day, they only solution they have for this is a secondary battery which can be plugged in.
Bandwidth
This is something which seems to have increased across the board. It was only really Wisycom and Audio Wireless providing proper wideband systems before, however now most manufacturers have at least 75MHz to play with, with some of the Wisycom receivers now going from 470MHz right up to 1.1GHz ‘Air band’.
This can allow greater flexibility, both with larger jobs in the UK where site specific licenses are required, or jobs in other countries where the clearest spectrum may be somewhere else
Close frequency Co-ordination
Something which has been said about digital systems is that frequency co-ordination isn’t something you need to thing about any more (I’m not entirely convinced about this), however there have been significant improvements in analogue systems too. Sennheiser introduced an intermodulation suppression mode in the SK5212-II and Wisycom seem to have taken this further in their newer ‘linear’ transmitters.
The ZHD modulations seem to have allowed zaxcom to squeeze even more frequencies in on digital, however this is at the cost of much higher latency and can only do this with 1 channel per receiver using ZHD48
Remote Control
This actually hasn’t changed much, but can be something which makes a big difference, especially with drama when there are costumes which are awkward to get at. There seem to be a few different ways of doing this:
Lectrosonics use the mic itself to play a ‘dweedle tone’ down. It a modulated audio frequency carrier (like timecode), which tells whichever transmitters that can ‘hear’ it to change a parameter (e.g. frequency, gain etc). Although it’s a bit clunky in some ways, it works rather well and the actors actually realise you’re doing something.
Sony and Zaxcom both use a 2.4GHz signal to remote control their transmitters. It’s possible to monitor and remote control a large number of transmitters using Sony’s rack receiver and a computer. A 3rd party program was made to do the same thing with Zaxcom, but it’s now been discontinued- however Zaxcom did show off something at this year’s NAB.
Audio Ltd also use a 2.4GHz communication system involving bluetooth and a phone app.
Serial Communication
We’re now getting some different recorders and radio mics talking to one another. Zaxcom have been doing this for a while, however it’s only been between their own products.
A few years ago, Sound Devices launched ‘Super Slot‘ as a standard. However, it’s only a connection standard: “The protocol of serial communication is outside the scope of this electromechanical specification. In addition to the sample commands listed below, Sound Devices will work to accommodate manufacturers’ existing command sets and protocols.”
So, although there is a mechanical standard, it requires the sound devices firmware to be able to interpret whatever wireless manufacturers output or can receive from their devices. At the moment, communication is possible between the Sound Devices SL-6 and the Audio ltd A10, Lectrosonics SRb and SRc, Sennheiser EK6042 and Wisycom MCR42.
Aaton have also made a serial connection system they call ‘Hydra’ which will allow the Cantar X3 and mini to talk to Audio ltd A10, Lectrosonics SRb and SRc, Sennheiser EK6042, Sony DWR-S02 and Wisycom MCR42.
The Mac OS program Wavetool will also talk to a number of (mostly rackmount) receivers in a similar way and can stream audio.
Comparison
I’ve put together a small table comparing features of different systems, as a bit of a round-up. Digital doesn’t necessarily mean good and all the different systems have their advantages and disadvantages. Also (apart from whether they’re digital or not), this doesn’t really have any bearing on sound or performance, it can be quite subjective. Just because a system has all the bells and whistles does not necessarily mean it’ll perform as well as another.
This is a bit of an observation on how sound kit rental seems to be viewed from both outside and inside the department. Hopefully this will be useful for both sound recordists and production staff in budgeting and booking sound crew and kit.
Sound Recordist “with kit”
This is a phrase I see very frequently in requests for jobs and it seems to mean that productions want one of two things:
An ‘all in’ quote, covering all eventualities
Free kit hire
It’s not as simple as that, though. Different jobs have different requirements. Sometimes it’s looking at hundreds of thousands of pounds worth of kit and multiple recordists and assistants, sometimes it’s a mic on a stand. Talk to us! We can give you a quote (or at least a ballpark figure)- the earlier you do this, the more chance you have of getting the budget and expectations to fit. I can do an ‘all in’ price, but it won’t be cheap…
Why can’t you give us free kit?
It needs to be paid for, otherwise we’ll just be losing money. We’re putting really expensive things on actors or members of the public who could drop them or run off with them. Things break, we have to get them fixed or replaced. I don’t go out with the same kit every time and some things which get used more frequently end up paying for other things which I want to have handy, or things that make my life easier. Also, I’d like to be able to give newcomers the chance to rent proper kit and not be essentially ‘paying to play’ on personal projects.
But the DP has got a deal with the rental house…
That’s great! But it’s not something we can do. Because we generally own our own kit, we’ll only occasionally use rental houses for more specific things. We’re not likely to be able to influence a production company to hire a lorry full of lights for our next commercial.
How much?
For context I’m going to put some rough new purchase prices down for professional kit:
Boom Microphone kit, £1500-£2500 (£800-£1500 for the mic, £400-600 for full wind protection and £300-£500 for the pole)
‘Bag’ Mixer/Recorder £3500-£6000. £10000+ for ‘cart’ machines
Radio mics are where things get expensive. It’s around £3000 for a transmitter and receiver pair. Personal mics for them would be about £3-400 each.
A “camera hop” = 2 channels of radio mics, as above and the camera mount will be about £400 too
So, for a boom, mixer/recorder, 2x radio mics and a camera link (so, 4 radio mics in effect), you’re looking at £17,500 worth of kit, not even including the batteries, cables, bags and cases to get it all working and to the job which could all put it over £20,000.
8 channels of radio mics, that’s over £25,000 on its own. And having more starts to bring about the need for RF distribution, remote antenna systems and even more boxes which can be thousands on their own
Can’t you use cheaper equipment?
It’s usually the case that we’ll choose the best tools for the job. Rental rates seem to be based more around what something does than the purchase price and the difference between prosumer and professional kit isn’t that much. Part of this is that the prosumer kit isn’t going to be designed for such intensive use, so will require more frequent repair and replacement (in fact, some manufacturers won’t repair it at all), so may have a higher running cost than the professional stuff.
Some recordists may have some prosumer items in their kit, but again- it’s stuff that won’t last as long and they may have made that call and deemed it the right tool for a particular job.
Can you use our equipment?
Usually no, although there can be some exceptions. Prep time would be required to test and put it together. I also have a co-ordinated set of radio mics. Extra ones from another manufacturer may not be compatible with the same plan, adding more isn’t straightforward- it makes things quite a bit more complex.
Why are UK rental rates as they are?
For a long time, throughout the 80s and 90s we were more limited with the equipment available to us and its capabilities. The kit was by no means cheap, but there was a more limited supply and it had more limited capabilities. An SQN field mixer, a boom and couple of channels of radio mics was all that was required for nearly all jobs (with the addition of a Nagra tape recorder for drama). That kit could last most of a sound recordist’s career- so they could save up, buy it and then rent it out as a ‘kit’ to production on every job. Rental value got to around the 1% of original value mark and stuck around that point.
Now we’ve had an acceleration in technology, it’s giving us the ability to point a lot more cameras at a lot of different things at once. This has meant we’ve become a lot more dependent on (and able to record) multiple radio mics. Now we’ve got small, ruggedised computers effectively. Sound Devices has released 5 different professional multitrack ‘bag’ machines in the last 10 years.
We’ve had 2 major re-allocations of radio frequencies, mandating new radio mic kit and there’s a big investment in digital RF kit to fit all the channels in. Although our microphone technology is staying mostly the same, there may be some increases in rental price coming up to compensate for the rate of turnover of equipment
Budgeting (and where you can save money)
Ok, so how much should you be looking at? I’m not going to put any prices down here (you can probably figure them out from recent quotes), but general guidelines for would be: 1x radio mic system per person simultaneously on camera at a time 1x boom + mixer/recorder per recordist 2x radio mic per 2 channel camera send 0.5x radio mic per set of wireless headphones 1x sync box per camera
Anything that can be hardwired is much cheaper, however moving it is more difficult.
Equipment for drama and commercials tends to charged for more as a ‘kit’. Higher end feature and commercials kits are often specced to cover ‘almost any sound recording situation’ in order to give production and director maximum flexibility. However, it won’t necessarily cover any courtesy feeds for clients or additional sync and playback equipment.
Traditionally, when setting up input gain the engineer sets it so that a ‘healthy’ voltage is coming into the system. A certain level of headroom is maintained in order to allow for unexpected peaks. 24bit analogue to digital converters have allowed us more flexibility in leaving headroom before system noise could become a problem.
Here’s a more traditional input diagram from the previous generation SX-R4 recorder:
I’ve been using the latest generation of Sonosax preamplifiers for a while now. I’ve known that they can handle a huge dynamic range since using them but I’ve only just found this in the AD8+ manual:
The thing which is initially quite alarming is that the only gain before the analogue to digital converters (ADC) is a switchable +20dB. Most professional equipment will have low cut filters, gain and analogue limiters before the ADC stage. If something overloads the ADC, it becomes digital garbage.
In this case, the paired ADCs can take a considerable amount of level- +21dBu (which is 24.6V) and +1dBu (2.46V) with the +20dB option enabled. To put this into context, most amplifiers are designed to take +18dBu max at input. So the only “real” gain setting is the +20dB option. In the unlikely event that an even higher voltage is coming in, there are analogue pots on the line inputs of the SX-R4+ (the small 5 and 6 knobs on the front).
This means more information is coming into the ‘digital world’ earlier in the chain and there’s no limiter- everything is captured as it comes in. The gain on any of the knobs, rather than controlling an amplifier is effectively a multiply function. Sometimes you’ll need to add gain just to hear a signal, however it now doesn’t really matter where it is added as long as the signal isn’t turned back into an analogue one, it will have the same result in post production as it will from the machine directly. Even if it’s sent over AES3, it’s the same 1s and 0s. Whether your post production facility want to work this way is another matter.
So, it should be possible to use an AD8+ as an analogue front end and get the same results without putting any gain on the inputs and adding ‘digital gain’ in another mixer or computer
Earlier this year I made a post about the theoretical use of audio interfaces as digital mixers. Since then I’ve got some toys and the experiments have begun:
I ended up getting a good deal on 2 of these interfaces. They each have 8 channels of AES3 audio in and out with sample rate conversion, although some of the connections are 75ohm RCA for consumer SP/DIF. They are also happy with a variable voltage range and are happy with reversed polarity on the DC input (even though the plug says 15V centre positive). The AVB connection allows them to link together and address multiple channels from one interface, essentially making a modular interface with all sorts of connections. Together they have 16 inputs and outputs.
Control Surface
I started off here running a Keith McMillen K-Mix, however it just runs standard midi control change and note outputs. These are easy to deal with and re-route, however I came across some issues with resolution which were solved by using a control surface that runs the Mackie Control Universal protocol (MCU). The cheapest one I could find was an iCon Platform M.
Lost in Translation
The problem with the MOTU interfaces in this instance was that they used a nice control protocol for computers to talk to each other, but not control surface hardware- they’re designed the interface with the view that it’s used on an ipad or similar. They use Open Sound Control to communicate (documentation here), so there needs to be a way of converting midi commands to this. It’s also one way- the interface doesn’t send any data back. So, I needed a way of translating midi commands to OSC.
Pure Data
After looking at a few solutions, and realising I can’t program properly- it dawned on me that I could use Pure Data. It’s an open source graphical programming language (similar to the proprietary Max/MSP) and I’d used it before on various music performance projects. It would also run on a raspberry pi– so could have a low power dedicated computer to do the translation work. I found it was actually pretty straightforward to get the midi in and the OSC out, however came across a few snags…
Linear faders
This is one of those terms where everything gets confusing. Yes, linear faders can mean they’re in a straight line- rather than rotary faders, which you turn. The potentiometers, however need to be logarithmic- every 3dB of attenuation is a halving of voltage. In most midi applications this would normally be done at the software end, but here it’s just a number being fed in. In order to do this a bit of mathematical transformation of the data was required and the higher resolution of the faders really helped in MCU (they’re used as pitch bend controls on each channel).
Mechanisation
In order to run 16 channels from an 8 channel controller I decided (possibly foolishly) to create a second layer on the PD patch and send back data to the control surface. It works, however the mute and solo buttons unexpectedly turned out to be a headache!
I had a look and I couldn’t find and DC powered interfaces with a Dante connection and a mix engine. Best option I can think of is to use a MADI interface (such as a MOTU M64 or RME Madiface Pro) and a Directout Exbox.md or Ferrofish Verto series converter
Talkback
I haven’t put a dedicated talkback control in yet, but should be a case of pressing a button to open a fader. There is a dedicated talkback button on the newer Motu 828es, however- although it only has mains power
I Want This
If you want to have a go with it, please feel free to get in touch. I can’t offer any kind of warranty or technical support at the moment- it’s just a thing I made. It should hopefully work with any of the Motu AVB interfaces and midi controllers with MCU emulation. It requires pd-extended 0.43-4 to run
I don’t normally do reviews per-se, but I thought this was a particularly useful bit of equipment and it may not be obvious at first glance why the Radial Catapult is so useful. So much so, I didn’t realise its usefulness until buying the wrong boxes…
Radial Catapult TX4
Standard Analogue over CAT5
I initially bought just the standard TX and RX boxes which don’t have any transformers. After doing some work making my own analogue to CAT5 adapters before, I found they weren’t rugged enough. Also I’d found that the Neutrik CAT6 connectors weren’t compatible with their standard ethercon connectors. These were obviously well made in pretty chunky steel cases. As CAT5 is 100ohm, it’s also ‘close enough for jazz’ to 110ohm and is able to run long distance AES3 digital signals. 48V phantom power can be provided as long as shielded CAT5 cable is used.
Splitters!
They also have the advantage of working like a 4 way ‘Y cable’ providing a passive split of the signal. As most of my kit is battery powered a lot of the time, I didn’t see a need to get the transformer versions. Everything in them is wired in parallel, so the same signals are split across both XLR connectors opposite from one another and the same signal comes out of both CAT5 sockets. There’s also all passive boxes, so no power supplies are needed, however any splits will incur a 3dB loss in signal.
The ‘TX’ boxes have 4x female XLR connectors and 4x male XLR connectors, while the ‘RX’ have 2 sets of 4 male XLR. In the case of the ‘TX’ boxes you can use them as sex changers and don’t necessarily run signals the way they’re intended.
Transformers: More than meets the eye
There are multiple different versions of the Catapult, with transformers optimised for mic (ending with an ‘M’) and line level (ending with an ‘L’) signals. They way they’re arranged is to isolate the 2 sides of the catapult box, but could also be used to interface unbalanced signals from things like laptops.
Something I can think of a very good use for them is for running out comms feeds to set. Typically we use small battery powered ‘beltpack’ TX for this, which only have an unbalanced input. Here you could put in a long run along one CAT5 cable without worrying about interference on the audio getting to the comms transmitter.
Another approach is to use a ‘plug on’ transmitter designed for balanced microphone inputs. However, it uses the cable shield as an antenna, and a 50m antenna is less than optimal for UHF. The transformer will break this up and a patch cord will have a better antenna length.
In this case, the TX4L would be the best box for this, plugging any microphones into the ‘input’ end and transmitters on the ‘splits’ of the other 2 channels on the other side of the transformers. These could run to either a TX or RX box (although sex changers would have to be used with the RX to run the transmitters the ‘wrong way’ up the CAT5 cable)
CAT5 is for networking
Who said network audio had to be digital? With multiple boxes it is possible to route signals to multiple locations using splits and the fact that dual CAT5 connections are on each box allows this. The transformers can also help isolate different systems running form different power sources and they have ground lift switches to avoid ground loops (however this will mean you lose phantom power). Do bear in mind the 3dB signal loss for each split, though- if you wanted to do something particularly complex it’d be worth getting amplifiers in to compensate.